Enyemaka:VisualEditọ/Ntuziaka onye ọrụ
| Rịba ama: Mgbe ị depụtara peeji a, ị kwenyere ịhapụ onyinye gị n'okpuru CC0. Lee Peeji nke Enyemaka Ọha maka ozi ndị ọzọ. |
| VisualEditor portal |
|---|
 |
| General |
| About |
| Help with the launch |
| Ọ bụrụ na ị ga-achọ ịnwale visual editọ, ebe a bụ ibe ebe ị nwere ike ịnwale ya na-enweghị ọgbachi. Ọ dighị mkpa inwe akaụntụ tupu jiri visual editọ na ibe ahụ. |
Ị mepe visual editọ
Mmalite: ogwe ngwaọrụ nke visual editọ
| Ogwe ihe nrụzi visual editọ na-egosi n'elu ihuenyo mgbe ịmalitere ndezi. Ọ gụnyere ụfọdụ akara ngosi ama ama: | |
| $wegharia ma $megharịa mgbanwe ndị i mebere. | |
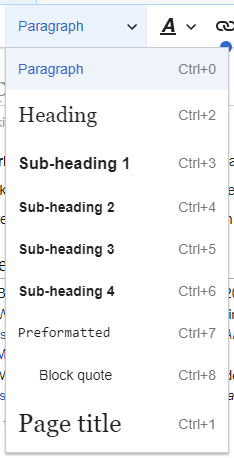 |
Isi' menu ndọpụta: na-enye gị ohere ịgbanwe ka esi ahazi paragraf. Ịgbanwe ụdị nke paragraf, tinye cursor gị na paragraf wee họrọ otu ihe dị na menu a (ịkwesighi ime ka ederede ọ bụla pụta ìhè). A haziri aha ngalaba "$format", na ngalaba nke nta bụ "$subheading2", "$subheading3", na ihe ndị ọzọ. To change the style of a paragraph, put your cursor in the paragraph and select an item in this menu (you don't have to highlight any text). Section titles are formatted "Heading", and subsections are "Sub-heading 1", "Sub-heading 2", and so on. Usoro nkịtị maka ederede bụ "$ụdị". |
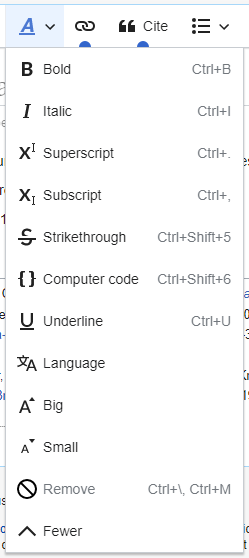 |
Formatting: ịpi "A" ga-emepe menu.
Ọ bụrụ na ị họrọbeghị ederede ọ bụla, mgbe ahụ ị pịrị "A" ka imepee menu, wee họrọ otu ihe, usoro ahụ ga-adaba n'ederede ị na-amalite ịdenye, site na ebe ọ bụla cursor gị dị. |
 |
Ngwaọrụ ejikọtara: Akara ngosi chain bụ ngwaọrụ njikọ. Ịpị ya (na-abụkarị mgbe ahọpụtara ụfọdụ ederede) ga-emepe nkwukọrịta njikọ. |
 |
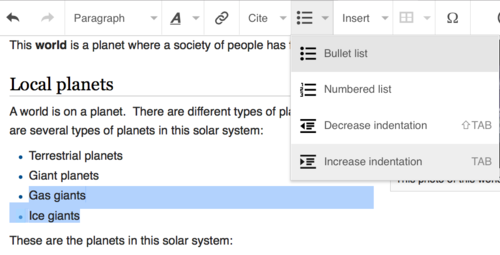
Depụta menu: A na-eji menu "Depụta" tinye ntinye n'ahịrị (nke a na-akpọkwa "ntụgharị ụkwụ" ma ọ bụ "ebensidee"). Ọrụ niile nwere ike nweta nhazi ebensidee yana ike ijikwa ebensidee ahụ ọzọ site na iji menu a. Ọ na-enyekwa ndị ọrụ ohere ngwa ngwa ndebiri mpaghara ebensidee, ma ọ bụrụ na enyere ndị a aka na wiki ha. |
 |
bọtịnụ Cite: Ọ bụrụ na agbanyere ọrụ citoid na wiki gị, mgbe ahụ ị ga-ahụ bọtịnụ Cite kama Depụta menu.
(Ntụziaka maka ịgbakwunye ebensidee na mpaghara Manual menu na wiki akọwapụtara dị na VisualEditor/Citation tool.) Instructions for enabling the Automatic tab are available at Enabling Citoid on your wiki Ọrụ citoid na-anwa ịdejupụta ndebiri ngụ na-akpaghị aka. |
 |
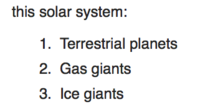
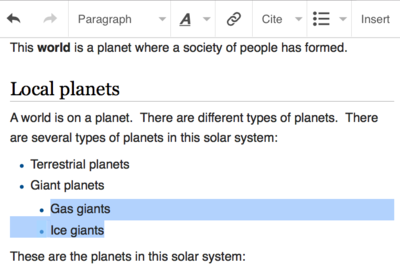
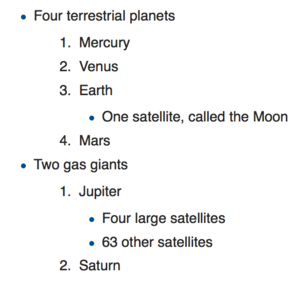
Ndepụta na ntinye aka: Ihe abụọ mbụ na-enye gị ohere ịhazi ederede ka "Bullet list" ma ọ bụ "$ọnụọgụgụ". Ihe abụọ ikpeazụ na-enye gị ohere ibelata ma ọ bụ welie ọkwa ntinye nke ndepụta ihe. |
 |
Insert: menu "Insert" nwere ike ịdị iche na ụfọdụ ọrụ. N'okpuru bụ ndepụta niile nhọrọ nwere ike ịpụta.
|
| Ṅtinye agwa pụrụ iche: Akara ngosi "Special character" (Ω) dị n'akụkụ menu "Insert". Mgbe ịpịrị ya, ọ ga-egosiputa mkparịta ụka na-egosi ọtụtụ mkpụrụedemede pụrụ iche. Site na ịpị otu mkpụrụedemede, tinye ya n'ime ederede. Ederede pụrụ iche gụnyere ụfọdụ akara ọkọlọtọ, akara ụdaolu, n'akara mgbakọ na mwepụ. (Enwere ike ịhazi ndepụta a na mpaghara. Lee VisualEditor/Special characters maka ntuziaka.) | |
| Bọtịnụ dezie ọkwa na-egosiputa ọkwa ọ bụla maka ibe ahụ. | |
 |
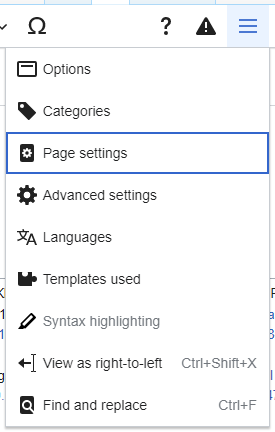
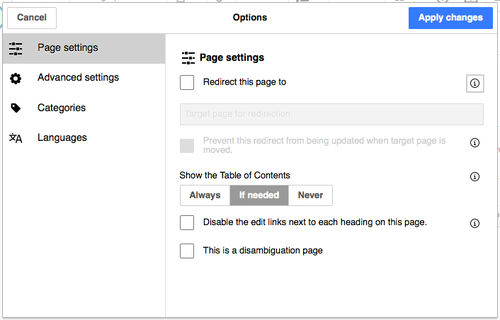
Ihe menu $pagemenu' dị n'aka ekpe nke bọtịnụ $save yana Mgbanwe editọ menu. Na menu a, enwere bọtịnụ iji meghee okwu Nhọrọ nwere taabụ ndị a (n'akụkụ aka ekpe):
A na-egosipụtakwa taabụ nke dialog Nhọrọ na menu $pagemenu tinyekw na- nwere ike imeghe ya site na ịpị ya. Ọzọkwa menu $pagemenu nwere bọtịnụ Lee ka aka nri-gaa-ekpe' na bọtịnụ Chọta na dochie nke na-emepe mkparịta ụka ebe ị nwere ike itinye mkpụrụedemede, usoro ma ọ bụ okwu oge niile ị na-achọ, maka na ndị ga-eji dochie ha, yana ọtụtụ bọtịnụ maka nhọrọ. |
| Bọtịnụ gbanwee gaa na ndezi isi mmalite dị n'akụkụ bọtịnụ $save. Ọ na-enye gị ohere ịgbanwe na wikitext editọ. | |
Mbipụta mgbanwe
Ndezi njikọ
 |
Enwere ike ịgbakwunye njikọ site na akara ngosi "Link" (njikọ dị n'agbụ) na ngwaọrụ, ma ọ bụ site na iji ụzọ mkpirisi Ctrl+K (ma ọ bụ ⌘ Command+K na Mac).
Ọ bụrụ n'ịhọrọ ederede (kpachapụta anya) wee pịa bọtịnụ "Link", a ga-eji ederede ahụ mepụta njikọ ahụ. Maka njikọ nke gụnyere naanị otu okwu, ị nwere ike họrọ okwu ahụ ma ọ bụ tinye naanị cursor n'ime okwu ahụ. |
 |
Mgbe ị na-eji bọtịnụ ma ọ bụ ụzọ mkpirisi, mkparịta ụka ga-emeghe ebe ị nwere ike pịnye njikọ ahụ.
Ngwá ọrụ njikọ ahụ ga-anwa inye aka na njikọ di n'ime' site n'ịchọ ihe nwere ike iyi ya. Once you have entered or selected the link, you complete the linking process by pressing ↵ Enter or by pressing the "Done" button. Your link will immediately appear on the page, but as with other changes to the page, it will not be published until you publish the entire page. |
 |
To link to a web page on another website, the process is similar: Choose the "External site" tab, and enter a URL in the box. |
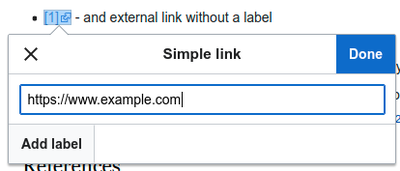 |
External links without labels look like this: [1]. You can add these by placing your cursor away from any word (e.g., after a space). Open the link tool by pressing on the button or pressing the shortcut keys. Type the URL in the box, and press the "Done" button to insert the link. |
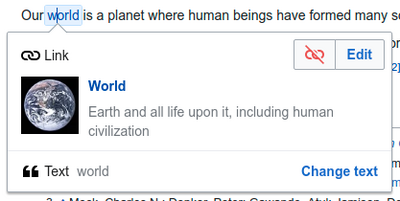 |
To change or remove an existing link, press within the text for that link, then press the "Link" icon that appears near it. The dialog will appear, for editing. You can also get to the dialog with the Ctrl+K keyboard shortcut. When a link is selected, it appears as blue framed.
In the link editing dialog, you can then change where the link goes. You can also remove the link entirely by pressing the "Remove" button in the upper right corner of the dialog. You can also open the link's target in another window by pressing on the copy of the link in the dialog box. (You might want do this to check if an external link is valid.) If you want to exit the link label (the text displayed as a link) or continue to write after this link, you can press →:
To edit the link label of an existing link, press within the link label and type the new one. But if you want to replace the entire label, please note:
|
Editing references
- For further information, see Help using citation templates or Help using citoid's Automatic tab
Determining which system is in place | |
| Your wiki may use one of three footnote systems. The one shown on the right is the simplest system, where the "Depụta" menu does not include any citation templates. If your wiki uses this system, then everything you need to know about footnotes is on this page. |  |
 | |
| In the second system, you again start by pressing the Cite button. Then a dialog box opens, which includes several popular citation templates set up for quick access in the "Manual" tab. If your wiki uses this system, then you will find more details at Help:VisualEditor/User guide/Citations-Templates |  |
| In the third system, you again start by pressing the Cite button. Then a dialog box opens, which includes an automatic citation process using the citoid service under the Automatic tab. If your wiki uses this system, you will find more details at Help:VisualEditor/User guide/Citations-Full | 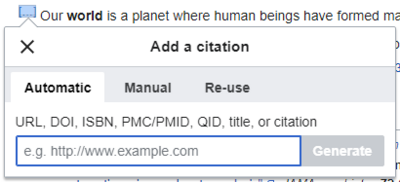 |
Editing an existing reference | |
| To edit an existing reference, press on it where it appears in the text (usually as a bracketed number). You will see either a "Edensibịa" icon (bookmark) or an icon (and name) for the template that was used to create this reference. In either case, pressing on the "Edit" button will open a dialog where you can edit the reference. |  |
| For the "Edensibịa" icon, pressing "Edit" opens the reference dialog. To start changing the reference information, press on it.
Many wikis use templates to format references. If a template is used in your reference, then when you move your pointer over the reference information, all the information in that field will be highlighted. If a template was used and you press on the reference information, then the Template icon (puzzle piece) will appear with some information. Press on the "Edit" button to edit the content of the template in the template editor dialog. |
 |
| If what appears when you press on a reference is an icon for a standard template for citations (an example is at right), then pressing "Edit" will open the template editor dialog. |  |
| Inside the template editor, you can add or remove types of information or change current content. Only fields (template parameters) that have content will show, initially. To add fields, press on "Add" at the bottom of the editor. |  |
| Press on "Apply changes" when you are done. | |
Re-using an existing reference | |
| If the page already contains a citation that applies to the text you want to source, then you can choose to re-use that existing citation.
To re-use an existing reference, place your cursor in the body of the text where you want to add a new reference (number) for that citation. Then press on the "Jirikwa ọzọ" item from the "Depụta" menu. (Note: If your wiki has the second or third footnote system described above, you'll see a "Re-use" tab, in a dialog, instead of a "Jirikwa ọzọ" item on the "Depụta" menu.) |
 |
| In the Edensibịa dialog, look at the list for the reference you want to reuse, and select it. If there are many references, you can use the search box (labeled "Chọọ n'ime edensibịa ndị dị adị") to list only those references that include certain text. |  |
Adding a new reference | |
| To add a citation using the "Depụta" menu, place your cursor where you want to add it in the text. Then click "Basic". |  |
Using the "Basic" citation | |
| Shown here is what you will see if you select the basic references item. In the Reference editor, you can add your citation, including formatting.
You can make the reference belong to a given group, although normally this is left blank. (This option is used to display groups of references with the "Ndepụta Edensibịa" tool.) |
 |
| In the Reference dialog, if you want to include a citation template, or any other template, in your new reference, press the Template icon (puzzle piece) in the "Insert" toolbar menu within the Reference editor. |  |
| Then, look for the template you want to use, add it and edit it as you would any other template. (See the Editing templates section, below, if you need more information about templates.)
After you are done editing your new template, press on "Apply changes" to return to the Reference editor, and "Apply changes" again to return to the page you are editing. |
 |
| If there isn't already a list of references on the page (for example, if you are adding the first reference for the page), you need to specify where the list of references, and their text, will be displayed to the reader.
Place the cursor where you want to display the references list (usually at the bottom of the page), open the "Insert" menu and press the "Ndepụta Edensibịa" icon (three books). |
 |
| If you are using several groups of references, which is relatively rare, you can specify the group in this dialog. Only the references that belong to that group will be displayed on the page at the location where you are placing the group.
The final step in the References list dialog is to press "Insert". |
 |
Using standard cite templates | |
| Your local wiki may have added extra citation templates to the "Depụta" menu. If so, you have quick access to the most-used citation templates for your wiki. (Instructions for adding extra citation templates to your local wiki are available at VisualEditor/Citation tool.) |  |
| Pressing on a template icon such as "Cite book" will take you into the template editor for that template. Important information fields may be marked with an asterisk. While the most common fields will be shown, not all of them are required. |  |
| To add more parameters, scroll down in the template editor and press on the "Add" option.
Press on "Insert" when you are done. |
 |
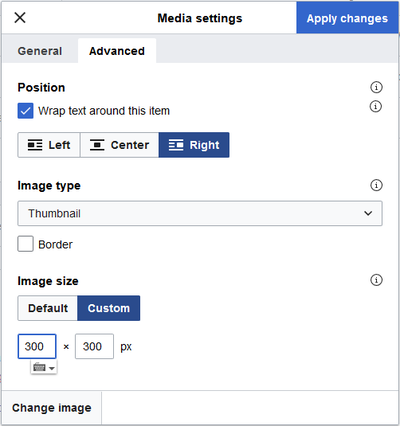
Editing images and other media files
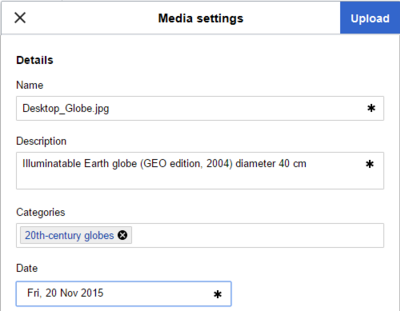
Uploading images
Editing media galleries
Editing templates
The powerful MediaWiki template system lets you insert dynamic content, text from other pages, and much more. For a detailed explanation and examples, see the Templates help page.
In the VisualEditor you can search for a relevant template, add an invocation or transclusion on the page you’re editing and, if needed, add custom content using parameters.
Insert new template
| To add a template to a page, place your cursor at the position on the page where you want the template to be inserted. Then open the Insert menu and select " |
 |
| Find the template you want to insert by typing either its name or a relevant keyword. Results containing the search term in either the name or description will display in a dropdown. This should help you find a relevant template, even if you don’t know its exact name.
If you’re having trouble finding the kind of template you want by using keywords, you can look on other wiki pages with similar content and view or edit the page source to see which templates are in use. When you find the desired template’s name, you can type it into this field to insert it here. |
 |
| You can also edit a template that’s already on a page. When you select the template you want to edit, it turns blue, and a box appears displaying " |
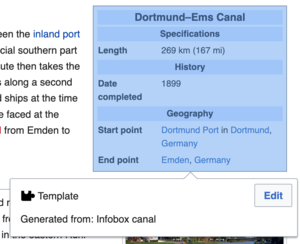 |
| Some templates are not visible to someone reading a page. In the visual editor, such hidden templates are still shown so that you can click and edit or delete them. The name of the template will be shown next to the puzzle icon and both will be grayed out. |  |
Template parameters | |
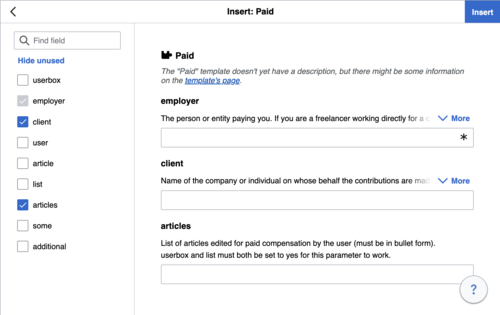
| You’ll see this dialog box when you’re adding a new template or editing one already in place. What you see in the box depends on whether the template in question contains TemplateData, helpful metadata added by other editors to make it easier to edit templates in the Visual Editor.
When a template contains TemplateData, the VisualEditor can use it to present annotated fields for you to fill in.
|
 |
| You can disable any optional parameter (which have blue checkboxes on the left side). If a parameter’s checkbox is grayed out and not clickable, the template requires that parameter, so it can’t be disabled.
When you insert a new template, you may find that some optional parameters are pre-selected. That means the author(s) of the template recommends the use of those parameters. It’s best to review all parameters that will be used in a template to ensure you understand their use. Clicking an unchecked parameter adds it to the template. Clicking a parameter that’s already been added takes you to the parameter’s input field. Some template parameters will show as “deprecated”. Don’t use deprecated parameters when inserting a template; they’re only visible to you because those parameters are in use on older pages where this template was included. |
 |
Adding undocumented parameters | |
| If you’re inserting or editing a template whose author hasn’t laid out its parameters in TemplateData, it has what we call “undocumented” or “unnamed parameters”. In these cases, you should consult the page for the template itself. There you can learn how to correctly employ and work with all of the template’s parameters. This includes learning the exact names of the parameters as written by the template author.
If you find in the documentation that the template expects parameters without names, fill in numbers as placeholders for the parameter names using the undocumented parameter input, then add text to the values you want to provide as you normally would. Example:
If you accidentally include nonexistent, misspelled or erroneous parameters, the values you enter for those parameters won’t show up on the page you’re editing. |
 |
Autogenerated parameters | |
| In this example, the template in question lacks TemplateData but it was possible to autogenerate the parameters. This means that the undocumented parameters have already been added for you, but the names may not be easily understandable and the dialog cannot display any directions or descriptions. As a result the dialog box provides a link to the template’s documentation, which should help you deduce and fill in the template’s various parameters. |  |
Editing multi-part template content | |
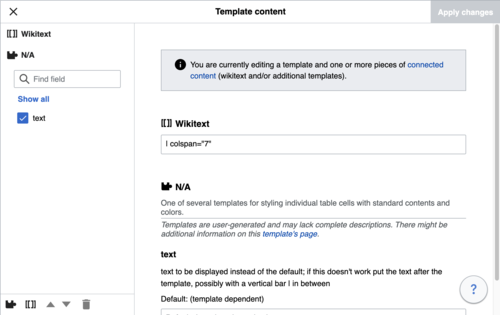
| During editing, you may open template content consisting of multiple templates or a single template linked to some wikitext. This differs from the nested templates described below. In this case, the templates are better visualized as being stacked or connected.
This content often contains “unbalanced templates,” templates which are incomplete on their own and need to be paired with some wikitext or another template in order to function. These related pieces of template content must be created in wikitext, but can be edited in the VisualEditor. In these cases you will see a notice at the top of the dialog to signal the situation and a specialized toolbar will be visible at the bottom of the sidebar. There you can use the icon buttons to add additional templates, additional wikitext, delete elements or change their order. |
 |
Nested templates | |
| Templates can include other templates as the value for parameters. You’ll recognize it when you see a parameter whose value contains the double curly braces ( {{ }} ) denoting a template.
The VisualEditor can’t present this template within a template (a nested template) using the editor’s easy-to-use interface, so if you want to nest a template yourself, you’ll need to understand how to add the template by hand in wikitext into the appropriate parameter field. |
 |
Completing your edit | |
| When you have finished editing a template, you can click "Apply changes". Then you can preview your edit and make sure it looks the way you want and expect.
You may also see an error message, which (like the other TemplateData mentioned above) is community-provided content and may vary in usefulness. You may need to consult the template’s own documentation to get to the bottom of some errors. If you’re still having trouble, consider posting about your problem on the template’s talk page. |
|
Removing a template | |
| To remove a template in the VisualEditor, click the template box. Press the "Delete" or "Backspace" key on your keyboard. The template will disappear from the page. |  |
Editing on mobile | |
| When editing a template on a page using the VisualEditor on a mobile device, you’ll see that the sidebar starts out hidden. You can make it visible by pressing the “Show/hide options” button. |  |
Substituting templates | |
| When you insert a template in a wiki page, its content and appearance are reevaluated every time the page loads, based on the template code and the values of its parameters. This means if someone updates the code of a template, then every page which uses that template will also get updated when they publish.
There’s another, much less common way to use templates, though, and that’s to substitute a template. Doing this permanently includes the template content just as it appears at the moment you insert it. It will not update if the template code is later changed. Most users won’t ever need to resort to substitution. Substitution is typically only useful when you need to capture the exact appearance of one version of a template, such as when content is under development and needs evaluation. To substitute a template in the VisualEditor, insert a template using the name syntax When you’re finished, press “Insert”, which will insert the template content as you see it. |
 |
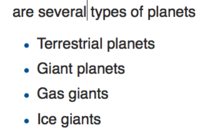
Editing lists
Editing tables
Editing categories
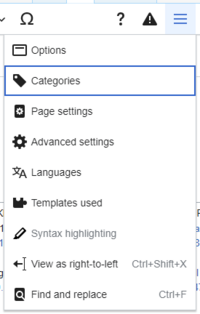 |
To edit categories, on the "Page options" menu, press the "Ụdàkọ" item. |
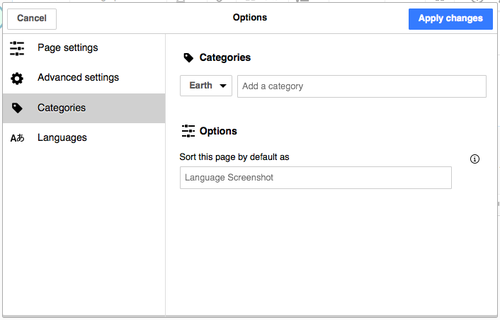 |
Pressing on "Ụdàkọ" opens a dialog that lists existing categories and allows you to add new ones, and to delete existing categories.
You also have the option of setting or changing the general (default) sorting key, which determines where the page appears when listed with other pages in the same category. For example, the default sorting key for the article "George Washington" is "Washington, George". In the category "Presidents of the United States", the article is listed under the letter "W", not the letter "G". |
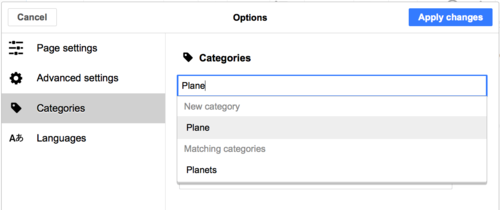 |
To add a category for a page, type the name of the category into the field "Add a category". As you type, the visual editor will search for possible matching, existing categories. You can either select an existing category, or you can add a category that doesn't yet have its own category page. (Until that category page is created, your new category will show as a red link after you publish all your editing changes.) |
 |
To remove an existing category, press on it and press on the "Remove" icon (trash can) in the dialog that opens.
Pressing on a category also allows you to specify a sorting key for that specific category. Such a sorting key overrides the default sorting key. |
| Press "Apply changes" when you are done editing categories to return to the page editor. | |
Editing page settings
Editing maps
 |
You can add and change maps. See Help:VisualEditor/Maps. |
Editing mathematical formulae
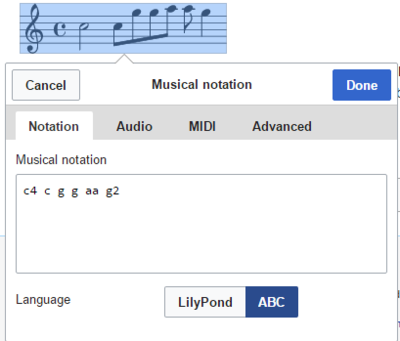
Editing musical scores
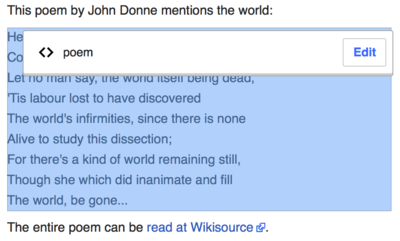
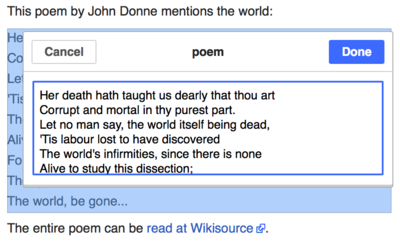
Editing poems and other special items
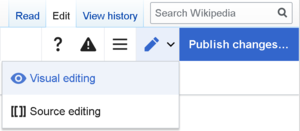
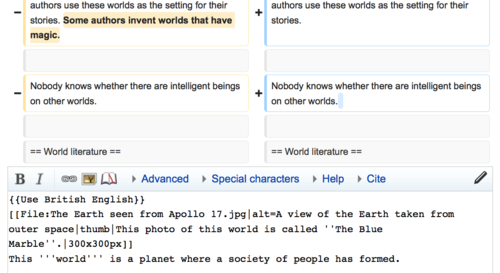
Switching between the visual and wikitext editors
Keyboard shortcuts
Many editors are used to entering wikitext directly, especially bold, italics and wikilinks. Keyboard shortcuts allow to quickly apply formatting without having to use toolbar items. Here are some of the most common shortcuts in the visual editor:
| Ụzọ mkpirisi PC | Omume | Ụzọ mkpirisi Mac |
|---|---|---|
| Ctrl+B | bold | ⌘ Cmd+B |
| Ctrl+I | Italiks | ⌘ Cmd+I |
| Ctrl+K | Tinye njikọ | ⌘ Cmd+K |
| Ctrl+X | Bee | ⌘ Cmd+X |
| Ctrl+C | Copy | ⌘ Cmd+C |
| Ctrl+V | Tapawa | ⌘ Cmd+V |
| Ctrl+Z | Megharịa | ⌘ Cmd+Z |
Also see the full list of all keyboard shortcuts.

